Started with a new static site ?
April 2024 (1116 Words, 7 Minutes)
Hello again. I was wasting my time scrolling through Instagram memes and laughing at someone’s story. Meanwhile, I felt like I was being dumb or free enough to scroll and kill my valuable time. After thinking for 5 minutes, I came up with a conclusion, “Let’s scroll one more time,” and the rest is 56 minutes I killed. After this, I decided to write another blog about how to register your free .com.np domain and host using GitHub and Netlify.
Firstly, let’s go to register.com.np and create your user login. At least if you’re a tech guy, you can do this. Do it!
Next, let’s search for a domain name. You know what a domain name is, right? Okay, after that, let’s search for a name called “dhinchakpooja” (she sang a lot and then stopped. I don’t know why, but yes, that was her life’s best decision). Voila, the name is available!
 Screenshot of register.com.np homepage.
Click “Register”, which leads you to a page where you might get confused about the DNS server. Don’t worry, there’s an example of a DNS. Copy this and save it for now, as we will change it later. After the DNS section, there are more details to fill in, like administrative details and technical contact etc. Save and continue.
After this, the part where the following documents are required:
- Cover letter (you can generate a cover letter from here - Prabhuhost)
- Citizenship Documents (keep in mind the document size should not exceed 200kb and should be on one page, for that you can visit Yarsahost.com)
- Additional Documents (these will be optional)
 List of document requirements for registration.
Save the documents, upload, and continue. Save and repeat two or three times as per the documents needed and click next. This will send the application to the registrar’s office, which will take 1-2 days to approve your domain. If not approved, you may have a lack of documents, so recheck and resubmit until you get your domain. Keep following up with them, my boy!
So, after a few days, the domain will be accepted and you will receive a notification either by email or in the portal of register.com.np. After this, you can see it on your profile under Dashboard > Active Domains.
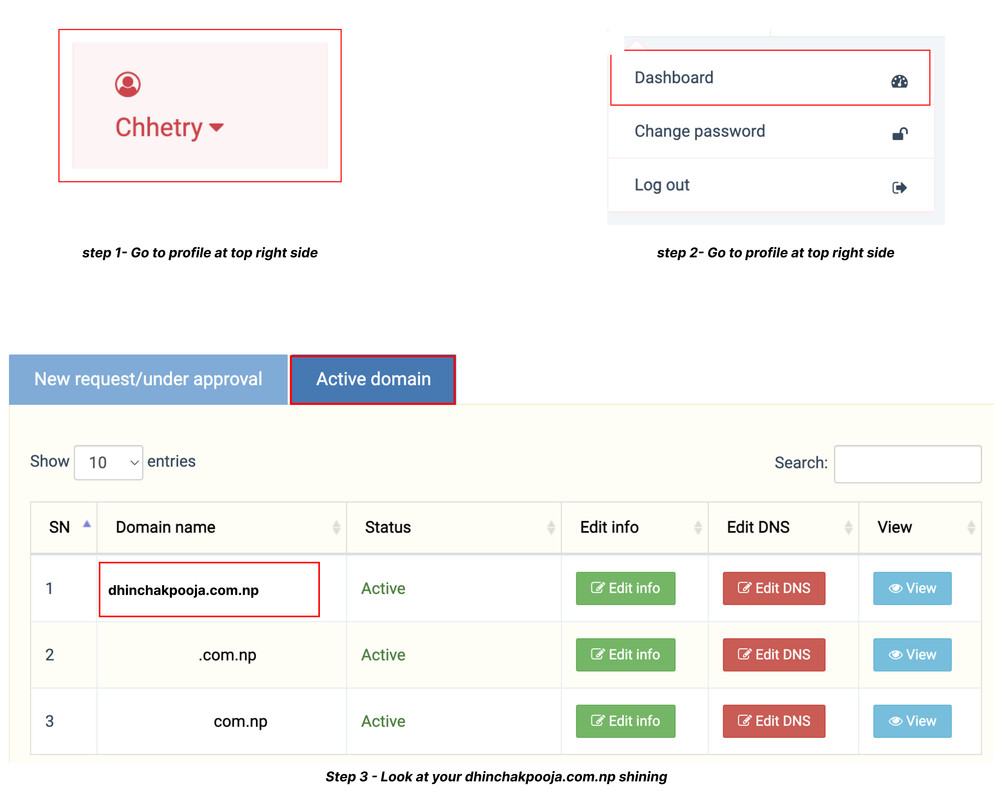 Look at your dhinchakpooja.com.np shining
After this, you have your free .com.np domain name. So, let’s move further.
Hosting
Let’s talk about hosting: Hosting refers to the practice of storing, serving, and maintaining files or data for a website or an application on a server that is connected to the internet. When you create a website or develop an application, you need a place to store all the files, including HTML, CSS, JavaScript, images, videos, databases, etc. This is where hosting comes into play.
Here, we discuss a few free hosting sites, but we will focus on Netlify later, which is the best among these and which I have already tried for a few years.
Github
So, without wasting any time, let’s jump into Netlify. You can log into Netlify via GitHub, Bitbucket, GitLab, or with your own email. However, I suggest you link your Netlify with your GitHub, account. Simply start Netlify with GitHub, or sign up with GitHub. But, you already have a GitHub, account, right?
What do you mean, you don’t have a GitHub account? Sign up for GitHub quickly, you nerd! Let me show you how to set up your GitHub account.
Click here for Github signup and follow these steps to create your account!
](https://i.postimg.cc/q79k7RGm/github-setup1.jpg) Step-1 Signup Github
Step-1 Signup Github
](https://i.postimg.cc/1tGfhwZ0/github-setup2.jpg) Step-2 Signup Github
Step-2 Signup Github
So, finally, you’ve created your GitHub account. Now, let’s move to Netlify.
Netlify
Without wasting time, let’s jump into Netlify’s sign-up page. If you already have an account, log in. I repeat, do this with your GitHub account. Are you understanding what I am saying?
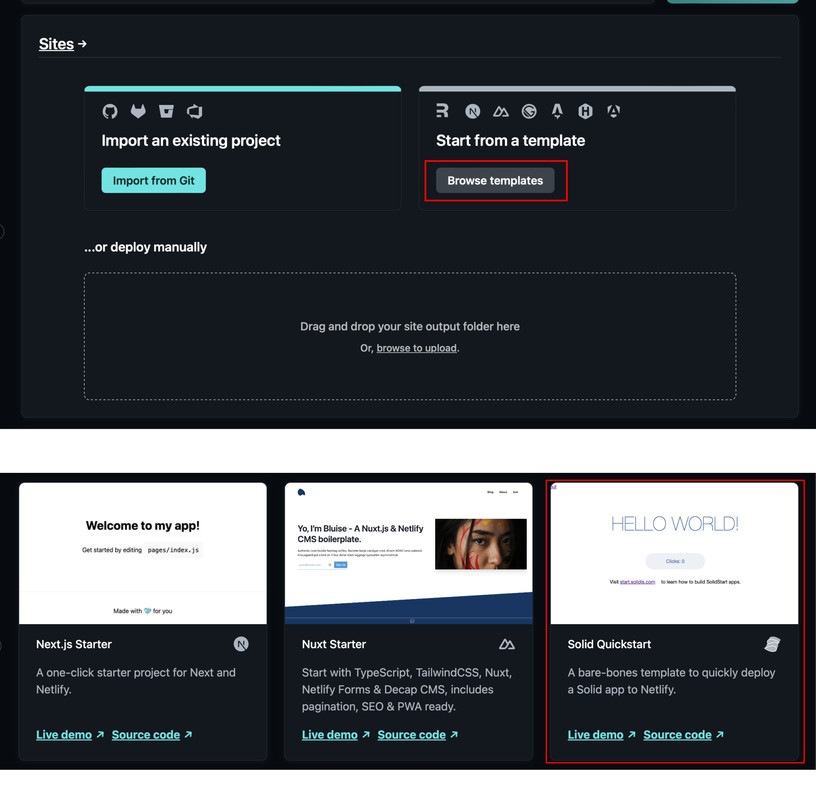
After logging in/signing up with Netlify, you have to create a team name. Choose a name according to your preference. For me, I chose “dhinchak”. Continue with the following steps:
- Browse template
- Choose website template
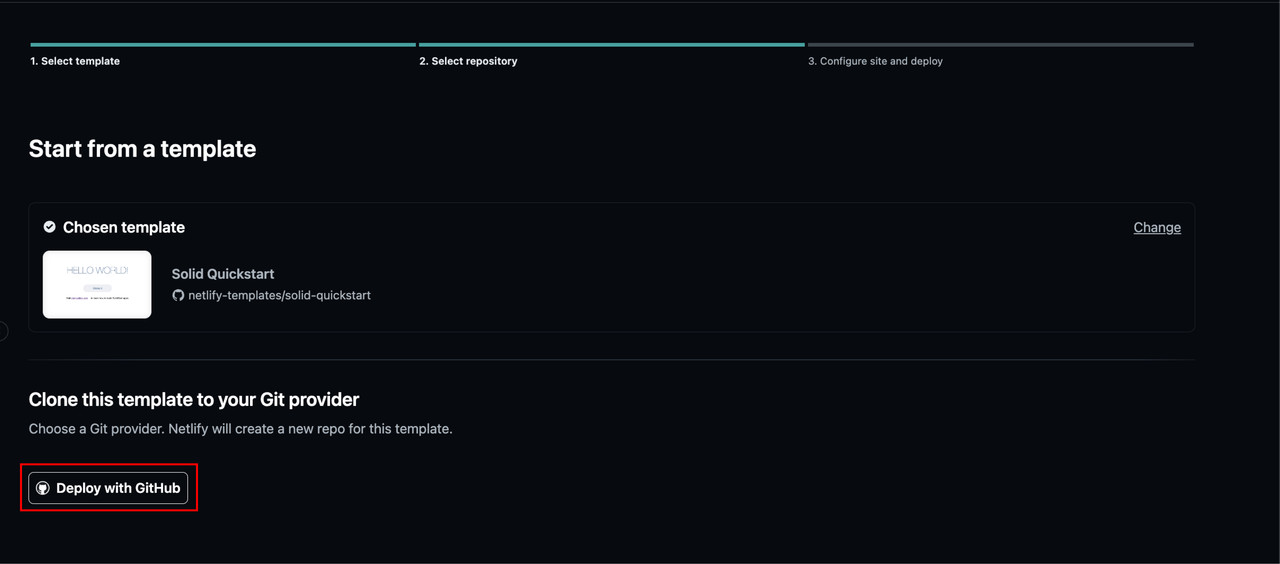
- Deploy with GitHub
After this, you might see this kind of page. Simply fill up the form and continue with ‘Deploy Site’. Keep in mind to put your actual domain name in the ‘Site Name’ field. This will create a public repository on GitHub with these templates and codes {demo codes}.
After clicking “Deploy Site”, please be patient and wait for 1-2 minutes. Not everything is instant, so waiting is necessary!
Now, your site is finally deployed and running on a Netlify local domain, named something like this (https://main–regal-fox-72dbea.netlify.app/) . All you need to do now is connect your Netlify DNS to your actual domain name server (dhinchakpooja.com.np).
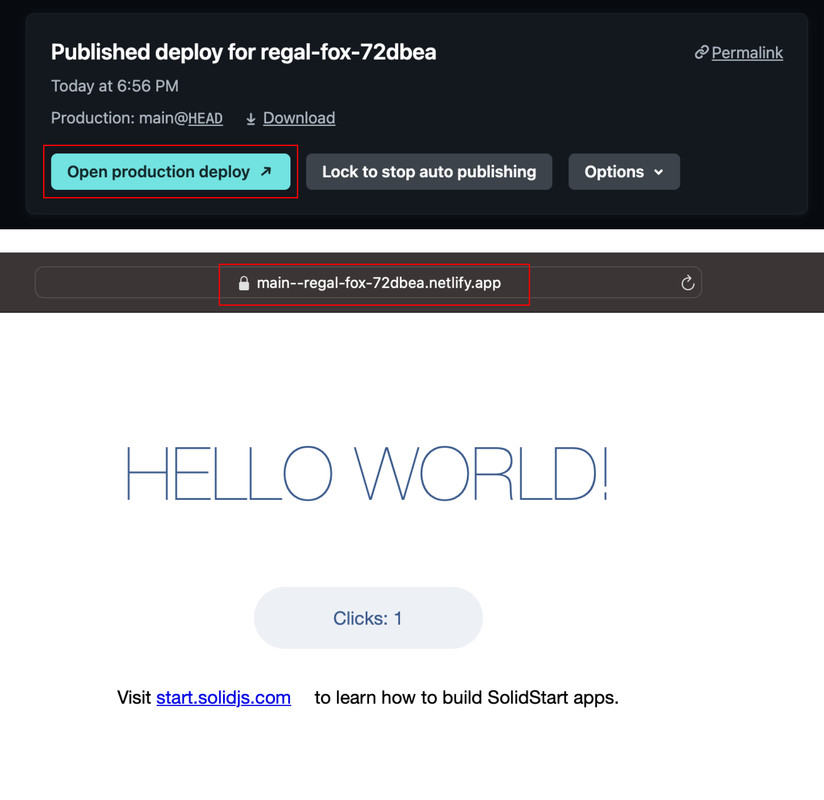 Live on Netlify’s own domain
Domain Name Connection
Ok, now your site is live but on a Netlify’s own domain. We have to shift it to our own domain. For that, click on ‘Domain Management’ as shown on the left side of your page, then follow these steps:
- Enter your domain name (e.g., dhinchakpooja.com.np)
- Verify
- Add domain
Now this leads you to the next page of Production domains.
On there, let’s click on your primary domain as dhinchakpooja.com.np, click in the center of the line where it says Awaiting External DNS, and scroll down to the end where it says Set up Netlify DNS for dhinchakpooja.com.np. Click this and follow the steps.
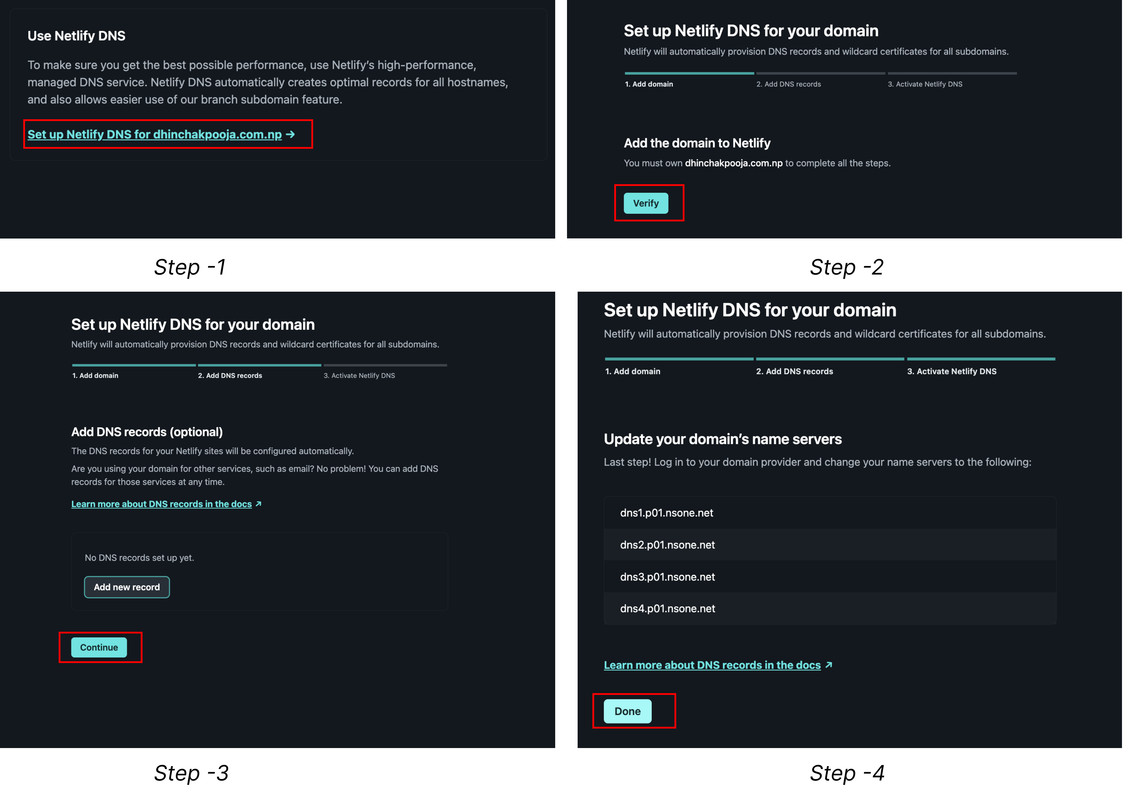 step to setting up DNS
copy this DNS.
dns1.p01.nsone.net
dns2.p01.nsone.net
Now, let’s move to the first part where we set the DNS as default on our register.com.np domain name server, where DNS 1 and DNS 2 are located.
Locate the domain and click ‘Edit DNS’, then paste the details you copied recently as:
dns1.p01.nsone.net
dns2.p01.nsone.net
Paste these into the primary name server and secondary name server fields respectively, and edit DNS. This might take some time to update your DNS, so be patient.
 step to setting up DNS
So, after the domain registrar verifies and updates your name server to the Netlify DNS, your production domains look like this:
 setting up DNS
After this, your URL or domain dhinchakpooja.com.np is live and can be accessed.
Goodbye !!
In this part, I’ve mentioned and clarified how you can get your own domain and host it for free on Netlify with a custom web template. If you want to create your own hardcore-coded website, you can upload it from GitHub and deploy it on Netlify. Alternatively, you can deploy it directly on Netlify. However, I recommend deploying it on GitHub first and then going for Netlify.
So, that’s all for today. I hope we meet again soon to discuss how you can deploy your own site with actual code from GitHub and then host it either here or on a premium hosting platform, whether it’s a static or dynamic site. Until then, stay curious and keep learning.
Let’s give a round of applause for DhinchakPooja, who has become our role model in demonstrating site deployment, even though she’s a great character without singing. Hopefully, she will never do that again. Goodbye!